Pinterest

Tuesday, July 31, 2018

'Thank You' Card for CTMH Fresh Air Fun Challenge Entry and Collage Photo from July Workshop


Thank You Card using Fresh Air
papers and embellishments

'Thank You' Card for CTMH Fresh Air Fun Challenge Entry
and Collage Photo from July Workshop


First, this post shares a Thank You card for Heart2Heart's Fresh Air Fun Challenge. The succulent is the only item that is not CTMH as it was a Cricut 'print and cut' design. I think it goes well with these colors, don't you? This is an A2 card. The papers I used on the card base from top down are 4" x 1.25" (treetops); 4" x 1.5" (light wood grain with arrow); and 4" x 2.5" (horizontal logs).

I have been having so much fun with the Fresh Air papers and embellishments. This card is made from bits and pieces left over from my scrapbook and card-making workshop earlier in the month. I love that you don't have to waste any part of your Workshop Your Way kits. You can just keep creating beautiful things until they are all used up.

Second, here is a collage of some of the scrapbook pages and cards made during the workshop:


Here are the products I used to create this card:

Close To My Heart cardstock colors used:
Other Close To My Heart supplies used:
Also used:
Want to make this card? Let's go shopping! We can even make it together on a Facebook Live, if you'd like. Just let me know.
If you need a consultant, I'd be happy to help.
If you'd like to enjoy the added privileges of being a consultant, I can show you how. Check out the labeled tabs for more details. You can also contact me via comment or email.

Be sure to check out this and other challenges at Heart2Heart. I'm still new to participating in design challenges and I know I've gotten a lot of great ideas from checking out the other entries and also the past challenges.


Stay creative and continue to share kindness along the way,
Kimberly

Last Call for July Specials: Stamp of the Month - Highlight Reel and Stampaganza - B2G1Free

Last Call for July Specials


Today's the last day to pick up (1) July Stamp of the Month, and (2) Stampaganza - Buy 2 Get 1 Stamp Set Free offers. Want to check them out? Click the captions under each picture for a direct link to each item:
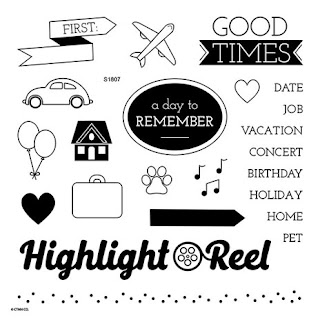
 July Stamp of the Month: Highlight Reel
July Stamp of the Month: Highlight Reel
Stampaganza!

Stay creative and continue to share kindness along the way,
Kimberly

Christmas in July Card for Heart2Heart, Double Trouble and SAS4Kids Challenges

Christmas in July Card

Christmas in July Card Challenges:
Heart2Heart: Christmas in July 
Plus Double Trouble Challenge #6
Plus SAS4Kids: Christmas in July

This post shares a three-for-one challenge entry. First, the Heart 2 Heart Challenge: Christmas in July calls for the use of any crafty Christmas supplies and also challenges us to pair up this entry with an entry at Double Trouble's blog. Challenge met!

Second, Double Trouble issues the "Something Anything Everything" Challenge. By the way, I don't think it was coincidence that the wandering dog had "trouble" on his name tag, do you? Thing 2 suggests a link back to a Heart 2 Heart Challenge. Thing 3's optional addition suggests decorating the inside of the card beyond just the sentiment. To meet this part of the challenge, I used my Cricut Cuttlebug and cut the word 'wonderful' out of a piece of Central Park paper that matches the background paper on the card front. Done, done and done!
Sentiment inside card says 
'Have a wonderful Christmas' 
with the word 'wonderful' 
cut out of CTMH Central Park 
paper using Cuttlebug

Third, Send A Smile 4 Kids Blog is also having a Christmas in July Challenge. I wanted to make a Christmas card that a preteen girl would like so I used my CTMH Rain or Shine Doll Stamp + Thin Cuts to make a girl dressed for a holiday party. The sentiment stamped in the color Glacier on the front of the card says 'All that glitters is snow!" so I wanted to add some glittery elements that would be fun for a young girl. Here's another photo of the outside of the card at another angle so you can possibly see the glittery embellishments in her hair, on her buttons, and representing snow with a blue 'snowflake' flower and silver gem wisps representing the snow's path into her hand.


Here are the products I used to create this card:

Close To My Heart cardstock colors used:
Other Close To My Heart supplies used:
Also used:
  • Watercolor pencils (hair, skin, shoes)
  • Recollections Bling Stickers
  • Fiskars Many Thanks Stamp Set (sentiment on card front)
  • Hero Arts Stamp & Cut Set (sentiment on inside of card)
  • Cricut Paper Trimmer
Want to make this card? Let's go shopping! We can even make it together on a Facebook Live, if you'd like. Just let me know.
If you need a consultant, I'd be happy to help.
If you'd like to enjoy the added privileges of being a consultant, I can show you how. Check out the labeled tabs for more details. You can also contact me via comment or email.

Be sure to check out the challenges at Heart2HeartDouble Trouble and SAS4Kids. You might enjoy checking out the other entries as well. I'm still new to participating in design challenges and I know I've gotten a lot of great ideas from checking out the past challenges.


Stay creative and continue to share kindness along the way,


Kimberly

Sunday, July 15, 2018

Top 3 Badge Earned, Double Trouble Design Challenge #4 and AHSC #272 Sketch Challenge Card Entry

Double Trouble Challenge #4
and AHSC Challenge #272

First, I'm so excited to share that I won a Top 3 Badge in last month's Double Trouble Challenge #3. Here's my shiny new badge:


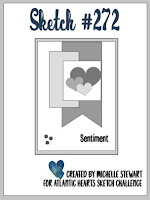
This post shares a new card I made today for entry into two challenges. First, Double Trouble Challenge #4 calls for a 3-2-1 Recipe using 3 colors, 2 words, and one stamped image plus an added sketch challenge, AHSC Challenge #272. This calls for using the following as a sketch on which to base your own card design:

Atlantic Hearts Sketch Challenge #272

Close To My Heart cardstock colors used:

Other Close To My Heart supplies used:
Want to make this card? Let's go shopping!
If you need a consultant, I'd be happy to help. If you'd like to enjoy the added privileges of being a consultant, I can show you how. Check out the labeled tabs for more details. You can also contact me via comment or email.

Be sure to check out the challenges at Double Trouble and AHSC. You might enjoy checking out the other entries as well. This is my first time hearing about the AHSC Challenge. I'm excited to add my card to the challenge. I know I've gotten a lot of great ideas from checking out the past challenges.


Stay creative and continue to share kindness along the way,


Kimberly
Sunday, July 1, 2018

Christmas in July: Gate Fold Card Tutorial (With Free Cricut Design Space File)

Christmas in July: Gate Fold Card
Christmas in July: Gate Fold Card Tutorial 
(With Free Cricut Design Space File)

I designed this card for the '2018 Christmas in July' event in the 'Cricut Design Space' Facebook Group. I hope you find time to relax and create beautiful memories with your family and also for yourself.

Photo of card in closed position
with bow tied, ready for envelope
Description:
This project makes one gate fold card that is A2 size (4.25”x5.5”) and an
accompanying envelope.

Finished size:
A2: 4.25” x 5.5”

Materials to Cut:
  • Cardstock in red
  • Cardstock in white
  • Cardstock in patterned print (I used red foil polka dots)
Everything Else:

  • Cricut 12x12 StandardGrip Adhesive Cutting Mat
  • Cricut Tools Scoring Stylus
  • Cricut Fine Point Pen (0.4) in Very Berry
  • Cricut Fine Point Pen (0.4) in Midnight Black
  • Gold ⅜” satin ribbon, 18 inches
  • Permanent photo safe adhesive
  • Personal holiday photo hand-trimmed no larger than 4” x 5.25”
  • Cricut Cuttlebug, optional
  • Coordinating embossing folder, optional
  • Adhesive to prevent fraying of ribbon ends (I used Fray-Check)
Preparation:

If you want to alter the project, click “Customize,” then use the tools in
the Edit panel to make changes before you cut. You can either hide my
project notes before printing by clicking ‘Customize’ and clicking the
eyeball, or simply skip those mats if you go directly to ‘Make.’

Cut:
  1. Follow the prompts in Design Space to cut the images from the cardstock.
  2. Insert the scoring stylus and pens when prompted to do so.
Assemble:
  1. Fold envelope cutout on scored lines and glue tabs to form envelope.
  2. Fold card along score lines.
  3. Glue patterned cardstock on inside and outside flaps of gate fold.
  4. Glue only the rectangle portion of the white inner card, centering on the inside of the red outer card.
  5. Using photo safe adhesive, glue personal family photo to center of inner white card.
  6. Emboss white rectangle used to protect photo while card is in transit, if desired.
  7. Thread gold satin ribbon through the ¼” holes cut on the ‘gate’ flaps of the red outer card. Tie a bow. Trim ends of ribbon on the diagonal. Apply an adhesive to the ribbon ends to prevent fraying.
Inside view of gate fold card, with
white cover sheet on the side.
Photo Credit for family photo insert
by Takashi Hososhima
Click this link to go to Cricut Design Space: 

Photo Credit:

By Takashi Hososhima from Tokyo, Japan - Merry Christmas from Danbo family, CC BY-SA 2.0, https://commons.wikimedia.org/w/index.php?curid=40589151